Search
Getting started
Understand how to make the most of your Help Center
A new approach to theming
-
Understanding our theming framework
Our themes and plugins make it easy to deliver a branded Zendesk Help Center to your customers in record time. Whether you need a ready-made template or the ability to customize pages quickly and confidently, we provide you with everything you need to get the job done.
Some theme providers attempt to provide layout and styling options through the use of theme settings alone, but this approach doesn’t come close to addressing the countless possibilities that exist. Because these themes are limited to a set of options defined by the theme author they often look the same and are difficult to customize and maintain.
What makes your themes different?
Our themes and plugins are all built on top of a powerful theming framework which provides a structured approach to customization and allows layouts to be copied between themes or from our ever-growing Pattern Library. You can think of the framework as starting with low-level settings and gradually building up to patterns which can occupy entire pages.
-
Settings offer direct control over basic aspects of your theme’s appearance, including color palettes, fonts and images. Changes made through both theme settings and Sass variables are reflected in the theme’s base styles and form the foundation on which everything else in the framework is built.
-
Utilities are single-purpose class names that you can use to make quick, specific changes to existing layouts. There are utilities for almost everything you could want to change, including colors, typography, positioning and sizing. They can even be combined to create entirely new designs.
-
Elements are building blocks that you can use to update or create new page layouts. They include common website and Help Center components like buttons, lists, cards, rows and columns. As with utilities, you can combine them to create new layouts or define your own using custom CSS.
-
Patterns are predefined layouts, ready to copy, paste and tweak. They are often compositions of both elements and utilities and can be copied in their entirety between themes or directly from the Pattern Library. Use patterns to get ideas and significantly speed up the design and development process.
-
Plugins instantly extend the functionality of your Help Center in ways that are not possible using Zendesk’s standard templates alone. They can be used anywhere in the theme, both as a part of broader page layouts and within article content.
This makes branding and customization faster, allows for rapid prototyping of ideas and ensures that changes are made in a consistent way based on the parameters decided by you when configuring top-level settings. There’s a practically unlimited number of ways that you can combine elements and patterns, to say nothing of the changes that you can bring about with utilities. The only constraint you’ll face is your own imagination.
Of course if one of our themes already meets your requirements, you can simply import it into Guide without making any changes at all!
-
-
Navigating the theme folder structure
Every Zendesk theme has the same folder structure, however there are some important additions for our range of themes.
Folder overview
├── assets/ ├── bin/ ├── scss/ ├── settings/ ├── templates/ ├── translations/ ├── manifest.json ├── script.js └── style.cssassets/The
assets/folder contains all custom files used by the theme, by default our framework-level JavaScript files.bin/The
bin/folder contains Ruby and JavaScript files responsible for compiling Sass source files into CSS and generating theme setting translations.scss/The
scss/folder contains the source Sass files used to compile the theme’s stylesheet.templates/The
templates/folder contains editable templates that define the layout of each page type, as well as the global header and footer. Each template is written using Zendesk’s full-featured templating language called Curlybars.translations/The
translations/folder contains translated labels and descriptions for each theme setting. If required, these can be updated using theupdate-translation.jsfile within theassets/folder.manifest.jsonThe
manifest.jsonfile contains information about your theme and is used to define the theme’s Settings panel in Guide.script.jsThe
script.jsfile contains the compiled JavaScript for your theme. Because every theme is different, functionality provided by our plugins are added separated through the use of theme assets.style.cssThe
style.cssfile contains the styles for your theme, compiled from the Sass source files. -
Getting familiar with our pricing
Our complete theming package is just that: everything you need to create an amazing, customized Help Center.
A single purchase grants you immediate access to:
- All of our themes and plugins
- The Pattern Library
- Comprehensive documentation
- Premium support for three months
You also get lifetime access to product updates, including themes, plugins and patterns released after the date of purchase.
Each purchase includes a multibrand licence allowing you to use our products on all brands belonging to your Zendesk account.
We’re available to assist with advanced customization if required and also offer extended support for those that are interested.
-
Requesting additional services
Every purchase gets your immediate access to all of our themes and plugins, built on top of a powerful framework designed to make it quick and easy to create a unique and beautifully branded Help Center for your company. This includes free theme installation in your Zendesk Guide account as well as three months of premium support.
If you don’t have the time to create your own custom theme using our theming framework, we can help. Here are some of the ways that we can help you deliver an amazing customer experience:
-
Branding
Branding involves updatintg the colors, fonts, images, icons and content element to perfectly match your company brand. This can include updating the page header and footer to match that of your company website.
-
Customization
Customization can range from simple layout changes to building an entirely new Zendesk Guide theme. We can also help build new and exciting functionality specific to your industry or use case.
-
Apps and integrations
We don’t just do themes. We can help you improve your agent experience as well through custom Zendesk Support, Chat and Sell apps. We’ll manage the entire process from design through delivery.
Visit our Services page for more information.
We are experts in design, development, UX and (most importantly) Zendesk and offer a full warranty on our work. Your satisfaction is guaranteed.
If one of the themes from our ever-growing collection ticks all of the boxes for you, we offer installation with every purchase. Getting up and running with couldn’t be easier.
-
Branding
Setting up Zendesk Guide
-
Importing and exporting your theme
Agents with Guide Manager privileges can import or export a zip archive of a Help Center theme, containing templates, JavaScript, CSS, and assets.
Importing a Help Center theme
You can import a zip archive of a Help Center theme.
To import a theme into your Help Center
-
In Guide, click the Customize design icon (
 ) in the sidebar.
The Themes page opens.
- Click Add new theme in the upper-right corner.
-
Click Import theme file.

The dropdown menu used to add and import themes -
Find and select your theme file.
Your theme files should be in a compressed file.
The theme is imported and appears on your Themes page.
You can have a maximum of 10 themes for each of your brands in Guide.
Exporting a Help Center theme
You can export any of your Help Center theme as a zip archive comprising page templates, JavaScript, CSS, and assets. This enables you to work on it locally, with your own development tools, and check it into version control. To make iterative changes to your theme, see Previewing theme changes locally.
Exporting your theme is the only way to access the
manifest.jsonfile for the theme. The manifest file enables you to customize the theme’s branding settings, including colors, fonts, and images.To export an existing Help Center theme
-
In Guide, click the Customize design icon (
) in the sidebar.The Themes page opens.
- Hover your mouse over the theme you want to export.
-
Click the options menu (
 ), then select Export.
The Themes menu visible after clicking on the Customize link The theme is downloaded to your computer in a zipped file.
-
-
Configuring Guide settings
You can manage your knowledge base configuration in Guide settings. You must be a Guide Manager to work with these features.
Accessing the Guide Settings page
Guide settings include options to manage your content, security, and integrations, and to deactivate your Help Center.
To configure your Guide settings
-
In Guide, click the Settings (
 ) icon in the sidebar, then select Guide settings.
Guide settings page -
Configure your settings. The following sections can be updated:
- Managing your content settings
- Working with security settings
- Working with integrations settings
- Deactivating your Help Center setting
-
Click Update.
Managing your content settings
Use the content management section to manage and moderate your public content, control spam, and configure notifications.
To manage your content
You can enable or disable these content management options:
- Anonymous voting on articles.
- The spam filter is enabled by default.
- Content moderation: sends new and edited knowledge base end-user content to a queue. You can set all content to be sent to the moderation queue, or specify certain words that will trigger the content being sent to the queue.
- Set the default sorting order for comments, when a user is looking at requests in My Requests. The options are:
- Sort by oldest comment to newest.
- Sort by newest comment to oldest.
- User profiles: can be public or private.
Working with security settings
Use the security section to manage content processing and sign in settings.
To work with security settings
You can enable or disable these security options:
- Display unsafe content: blocks certain content to reduce the risk of malicious code being introduced.
- Require sign in: prevents anonymous visitors to your Help Center.
Working with integrations settings
Use the integrations section to manage additional features that are available as Help Center add-ons. You can enable or disable these integration options:
- Google Analytics: includes Google Analytics tracking information for your Help Center.
- Chat: enables Zendesk Chat for your Help Center.
- Powered by Zendesk logo: displays the Zendesk log at the bottom of each Help Center page.
Deactivating your Help Center setting
You can deactivate your Help Center, preventing visitors from accessing it.
-
-
Understanding Guide roles and privileges
Administrators have Guide Manager privileges and agents have Guide Viewer privileges by default. Agents can be granted Guide Manager privileges as needed.
Overview of available roles
Guide supports the following user roles with different Help Center access privileges:
- Anonymous user is anybody who visits the Help Center without signing in.
- End user is somebody who has created an account and signed in to the Help Center.
- Guide Viewer is any regular Zendesk Support agent without Guide Manager privileges.
-
Light agents (Support Professional add-on and Enterprise add-on) have Guide Viewer privileges for accessing content.
- Light agents on Guide Lite and Professional cannot create or edit articles.
- Light agents on Guide Enterprise and Legacy can create and edit articles where agents have permission.
Permission for agents to view and edit knowledge base articles or community posts is not part of the role permissions, but is set the article level for the knowledge base and at the topic level for community.
- Guide Manager has full privileges in Guide.
For a list of specific permissions by role, see the section, Guide user privileges by role.
Setting content viewing and editing access for agents
Guide Managers have full access to the Help Center, including the ability to view all articles in the Guide admin and the ability to add, edit, and publish all content. These privileges are not part of the Guide Viewer role for agents by default, but are set at the article level for the knowledge base and at the topic level for community.
For the knowledge base, see the following articles to set agent viewing and editing access:
- Setting agent editing and publishing permissions on knowledge base articles
- Setting view permissions on articles with user segments
- Understanding agent privileges for user management permissions
For community, see the following articles to set agent viewing and editing access:
-
Changing the URL of your Help Center
By default, the address of your Help Center is a Zendesk subdomain, such as “mycompany” in
mycompany.zendesk.com. The host mapping feature allow you to map a subdomain of your own domain (for example,support.mycompany.com) to your default Zendesk address.A host-mapped Help Center address has the following format:

Host mapping doesn’t affect the URL of the agent interface. It only affects the external-facing URL of Help Center.
You can’t modify your support address to direct to a specific page within your subdomain, such as
mycompany.com/community/hc.Registering a domain name
If you don’t already have a domain name, register one and add a support-related subdomain to it.
-
Purchase and register a domain name with a domain registrar.
You can purchase and register a domain name from any domain registrar, including GoDaddy, Yahoo! Domains, Namecheap, 1&1, Netregistry, or Register.com.
-
After registering the domain name, use the registrar’s tools to add a support-related subdomain such as “support” or “help” or something along those lines. You’ll make the subdomain an alias of your default Zendesk address in the next section.
See the Help on the registrar’s website for instructions on adding a subdomain.
Working with domain names and subdomains can be confusing because it’s something most of us rarely do. Consult your system administrator, if you have one, before proceeding.
Making the subdomain an alias of your default address
The next step is to make your chosen subdomain an alias of your default Zendesk address. An alias is simply an alternate address for a website. For example, you can make the addresses
support.mycompany.comandmycompany.zendesk.cominterchangeable as far as browsers are concerned.You need to create a CNAME record on your domain registrar’s website to create the alias. If you have any concerns, consult your system administrator before proceeding.
To make your subdomain an alias of your default Zendesk address:
- Sign in to your domain registrar’s control panel.
-
Look for the option to change DNS records.
The option might be called something like DNS Management, Name Server Management, or Advanced Settings.
-
Locate the CNAME records for your domain.
A CNAME record, or Canonical Name record, is a type of alias used by the Domain Name System (DNS). Among other things, a CNAME record can be used to make a subdomain an alias of an external website.
- Do one of the following:
- If you don’t have a CNAME record for your subdomain yet, look for an option to add a new record.
- If you already have a CNAME record for your subdomain, look for an option to edit the record.
-
Point the CNAME record from your subdomain (shown in the Host Record field in the example below) to your Zendesk subdomain (shown in the Points To field).

The UI and terminology may vary depending on your registrar, but the concepts are the same.
It may take time for changes to the DNS system to be implemented. Typically, it can take anywhere from a few hours to a day, depending on your Time To Live (TTL) settings in the registrar’s control panel. In the example above, the TTL is 14,400 seconds, or 4 hours.
Specifying a new address
After making your subdomain an alias of your default Zendesk address, you need to specify the new address in your instance of Zendesk Support. If you don’t complete this step, your new address will point to a Zendesk error page.
The instructions in this section apply if you only have one brand. If you added multiple brands, specify your addresses in Manage > Brands instead of Settings > Account. See Adding multiples brands.
- Click the Admin icon () in the sidebar, then select Settings > Account.
- Select the Branding tab at the top of the page.
-
Scroll down to the Host Mapping section and enter your subdomain and domain name.
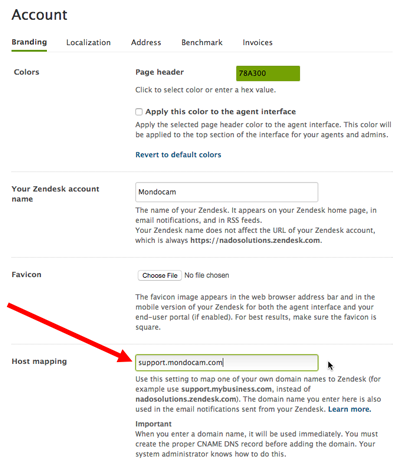
- Click Save Tab.
The final step is to set up hosted SSL.
-
-
The difference between standard and custom themes
You can use the standard theme that comes with Guide for your Help Center or you can customize the standard theme or create your own theme.
-
The standard theme is the Copenhagen theme that comes with Guide. It’s a theme designed for best practices and mobile responsiveness. You can update the Copenhagen theme using branding and advanced settings in the Settings panel but you cannot edit the code to customize the theme. Otherwise, it will no longer be considered a standard theme.
When you use the standard Copenhagen theme for your Help Center, it is supported by Zendesk and automatically updated when new theme features are released.
-
Custom themes (Guide Professional and Enterprise) are themes that you have modified (by editing the page templates, CSS, or JavaScript) or developed from scratch. Zenplates themes are examples of custom themes.
Custom themes are not supported by Zendesk and are not automatically updated when new theme features are released. You will continue to receive Guide features that are not theme-dependant, but you will not receive updates to your theme, as any update would overwrite your customizations.
Zenplates themes are regularly updated to support new features and a single purchase of our theming package gives you lifetime access to these updates as well as new themes and plugins.
-
-
Allowing unsafe HTML in articles
By default, Help Center quarantines unsafe HTML tags and attributes in articles to reduce the risk of somebody introducing malicious code. Unsafe HTML is not stripped from the articles on the server but simply not included in the HTTP responses sent to browsers. As a result, articles might not render as intended in browsers.
You can override the default setting to allow all the article HTML to be sent to a browser.
Making this change will allow potentially malicious code to be executed when users open an article in a browser.
To allow unsafe HTML in HTTP responses
- In Guide, click the Settings icon () in the sidebar.
- Under Security, select the Display Unsafe Content option.
- Click Update.
Safe tags
The following list contains tags that are considered safe:
strong, em, b, i, p, code, pre, tt, samp, kbd, var, sub, sup, dfn, cite,
big, small, address, hr, br, id, div, span, h1, h2, h3, h4, h5, h6,
ul, ol, li, dl, dt, dd, abbr, acronym, a, img, blockquote,
del, ins, u, table, thead, tbody, tfoot, tr, th, td, colgroup
Even if Help Center doesn’t strip safe tags, the third-party HTML article editor used in Help Center (TinyMCE) may strip some safe tags from the HTML. For example, the editor removes
<i>tags with no content, such as those used for Font Awesome icons.Safe attributes
The following list contains attributes that are considered safe:
href, src, width, height, alt, cite, datetime, title, class, name,
xml:lang, abbr, target, border
Everything else is considered unsafe.
- In Guide, click the Settings icon (
- See all 8 articles
Setting up Zendesk Gather
-
Configuring Gather community settings
You can set specific community settings in Gather settings.
You must be a Guide Manager to manage the Gather settings described in this article.
-
In Guide, click the Settings (
) icon in the sidebar, then select Gather settings.
-
You can enable or disable community-wide features from this page:
-
To activate or deactivate a community, see Disabling your Help Center community.
-
To enable or disable aliases, see Enabling community aliases.
-
-
-
Creating and managing moderator groups
Guide managers can create moderator groups for the community so that designated agents and end-users can manage community activity. Community moderators can be any users you choose to administer community content.
You can create multiple moderator groups, if you want to set different moderator permissions for each group. If you have multiple Help Centers, any moderator groups you create apply to all your Help Centers.
Moderator groups are based on user segments for signed-in users, which are built on tags and organizations. Make sure you’ve set up a user segment that contains all the users you want to include in the moderator group before you start (see Creating user segments).
You must have Gather Professional to create moderator groups.
To create a moderator group
-
In Guide, click the User permissions (
 ) icon in the sidebar, then select Community moderators.
You can see any moderator groups that you have already created.
-
Click Add moderator group.

-
Enter a moderator group name.
For example, approve_only_moderators might be the name of the moderator group that has permission to approve posts and comments only.
-
Set the permissions by selecting the actions you want to enable for moderators in this group.
- Mark as answered indicates that a comment has been added to the post that answers the subject of a post.
- Pin to top moves to the top of the posts list within its topic and has a star beside it.
- Feature post labels the post as “featured” and displays it in the featured posts component, if it’s in your theme.
- Move post changes the location of the post to another discussion topic.
- Hide for moderation removes a live post from the community and sends it to the content moderation queue for review. If you want to enable this action for the moderator group, ensure that you have content moderation enabled. Otherwise, this action will not be available to moderators, even if you have selected it here.
- Approve pending content makes the content visible in the community and removes it from the content moderation queue. This action is not available for content that is pending approval in the spam queue.
-
Under Add moderators, select a user segment for the moderator group.
You can only choose user segments for signed-in users, not staff user segments. If you need to create a new user segment, select Add new user segment.
Matching users appear below.
If your user segment includes agents, they will not appear in the matching list, even though they have the correct permissions. See Creating user segments for Guide user permissions.
-
Click Create group.
The moderator group is created.
When a user that has been added to the moderator group next signs in to the community, they will have additional user permissions that enable them to moderate content.
-
Supporting multiple languages
-
Adding translated text to templates
You can display snippets of translated text within your Help Center page templates. The translated variant of the text changes dynamically based on the user’s selected language, which can be updated using a language selector.
Examples of where you can use translated text include:
- A welcome message on the Home page
- A company tag line
- Service alerts and notifications
- Legal notices and disclaimers
Many of the pre-built page elements used in Help Center are already localized. For example, the element that lets users vote on an article displays “Was this article helpful?” in English and “Cet article vous a-t-il été utile?” in French.
For a list of available pre-translated strings, see the translation helper in the Help Center Templates docs.
Custom translated text uses the dynamic content feature in Support.
Specifying the language variants of the text in Support
You specify the language variants of a snippet of text on the Manage > Dynamic Content page in Zendesk Support. For instructions, see Providing multiple language support with dynamic content.
For example:

Add the content in the same language variants as the languages you support on your Help Center. If you don’t specify a variant for a language, nothing will be displayed in that language in the Help Center.
For example, suppose your Help Center supports English and French for a Canadian website. Add English and French variants of each snippet of text.

Make a note of the item name. You’ll need it for the following step. In the previous example, the placeholder is
{{dc 'welcome_message'}}, so the item name is “welcome_message”.Inserting the dynamic content in a template in Guide
Insert your text variants in Help Center templates with the dynamic content helper. When the page is requested by a web browser, the template helper inserts the appropriate text variant.
Do not include Curlybars in your dynamic content. Curlybar expressions placed inside dynamic content will not render correctly in Help Center, but will instead appear as text.
-
In Guide, click the Customize design icon (
) in the sidebar. -
Click the theme you want to edit to open it.
-
Click Edit Code.

-
In the Templates section, click the template you want to modify.
The page opens in the code editor.
-
Add the dynamic content in your template using the dynamic content helper. Example:
{{dc 'welcome_message'}}If the dynamic content is missing a variant, then the default variant will be used when that locale is viewed in Help Center. Guide managers, however, will see an error message for dynamic content that does not have a variant for the current locale when they edit the Help Center theme.
-
To save your changes, click Save at the top of the sidebar.
For more information on working with templates, see Working with the page code.
-
Adding translations to sections and categories
Any translated article must have a parent page translated in the same language. If you add a translation for an article that does not have a corresponding translation for the section or category, users will not be able to view the article in Help Center (even though the article is published).
The page hierarchy is as follows:
- Category landing page
- Section landing page
- Article.
For example, if you add an article translated in German, the article must have a German section page. In turn, the German section page must have a German category page. The Help Center cannot display orphan articles.
When localizing your Help Center, it makes sense to start by adding localized versions of category pages, followed by section pages, followed by articles. This workflow guarantees that any new translated article has a parent section or category page that’s translated into the same language so that users can view it.
You must be a Guide Manager to add section and category translations.
To add a translated title for a section or category
-
In Guide, navigate to an existing section or category.
-
Click Edit section or Edit category in the top menu bar.

-
Select a language for the translation you want to add from the list at the top of the page.

If you do not see a drop-down menu of languages, then you first need to enable languages for your Help Center (see Enabling languages for your Help Center).
-
Enter or paste the translated content for the name and (optionally) description.
Keep in mind that any translated page must have a parent page translated in the same language. After you add the translation for the parent page, you can click Refresh and it will take up to three minutes before the change is registered.
You’ll see a warning if you add a translation for a section that does not have a corresponding translation for the category. As a best practice to prevent these warnings, create the translated categories first, then go through and translate the sections.
-
Click Update translation to create the translated version of the page.
-
Repeat the steps to add more translated pages.