Search
Using Zendesk apps tools (ZAT)
Use Zendesk's developer tools to work more efficiently on your new theme
-
Previewing theme changes locally
You can export a theme’s files from Guide and work on the files offline in your favorite editor.
To avoid zipping and importing the files into Guide every time you want to preview your changes, you can preview each change locally in a web browser using the Zendesk apps tools (ZAT). To preview a change, you simply save the theme file in your editor and the browser will automatically refresh.
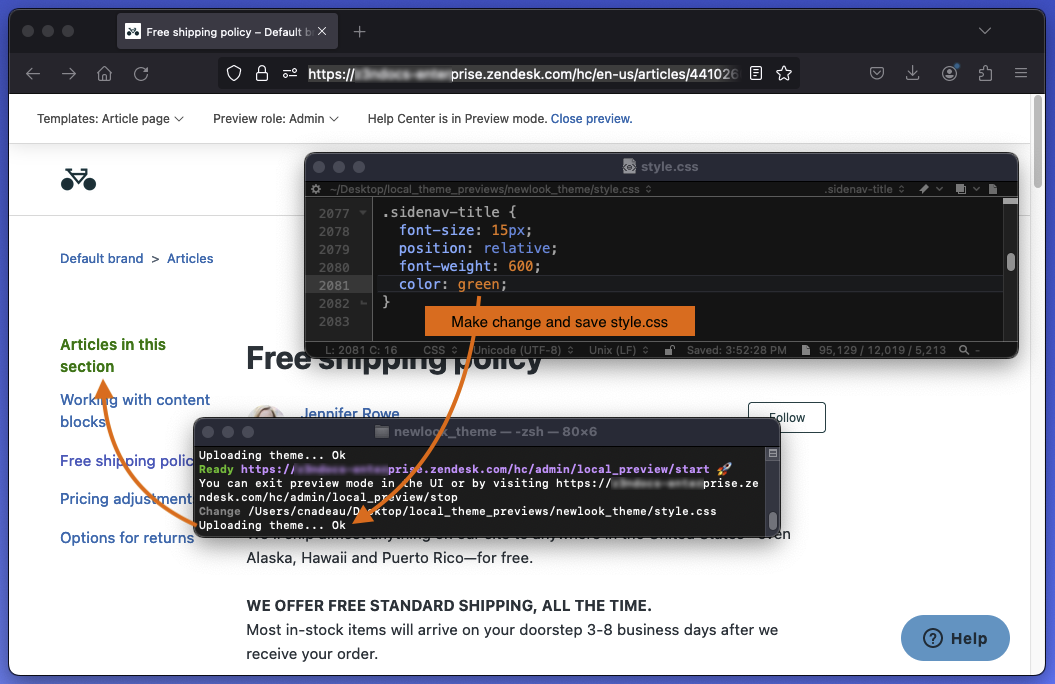
Previewing a theme locally ZAT is a collection of developer tools that includes Sinatra, a web server that runs locally on your computer. After starting the preview mode, the process runs in the background.
Setting up local theme preview
To set up local theme preview
-
If you haven’t already, enable API access in your Zendesk Support account by going to Admin > Channels > API.
-
Install the ZAT or, if you previously installed ZAT to build Zendesk apps, make sure to update it by running the following command in your command-line interface:
$ gem update zendesk_apps_toolsTo install and use ZAT, you’ll need a command-line interface (CLI).
In macOS, you can use Terminal in the Applications/Utilities folder. In Windows, you can use the command prompt or Powershell. If you’re a Windows 10 user, you can install and use a Bash shell, a more developer-friendly CLI.
Starting local theme preview
You should start local theme preview before you start working on theme files on your computer.
To start local theme preview
-
In your command line interface, navigate to the folder containing the exported and unzipped theme files.
Use the cd command (for change directory) to navigate to a child folder. Example:
$ cd guide_themes/my_custom_themeTo back up one directory, use cd followed by a space and two periods. Example:
cd .. -
Run the following command:
$ zat theme preview -
At the prompts, enter your Zendesk Support subdomain, as well as the email and password you use to sign in to Zendesk Guide.

The subdomain and email are saved in a text file named .zat in the theme’s folder so that you only need to enter your password the next time you start preview mode. If you make a mistake entering your username or password, delete the .zat file and start again. Note that files with leading periods are hidden in macOS by default.
If you use single sign-on (SSO) to sign in to Guide (such as using Google or Microsoft credentials), you can sign in using an API token that you can get from the Support admin interface.
When prompted by ZAT to sign in, enter
{your_email}/tokenfor your user name, replacing{your_email}with your agent email address. Use the actual API token for your password, for example:Enter your username: jdoe@example.com/token Enter your password: e8Pvy0pvGzE8meUQxWgjIYkjrAfter successfully signing in, preview mode starts and runs in the background:

-
Copy the “Ready” URL in the output and paste it in a browser.
In the example, the URL is https://subdomain.zendesk.com/hc/admin/local_preview/start.
Modern browsers have a security feature that blocks certain local files (known as mixed content) from loading in a page. If an unformatted page loads after you sign in you can disable the feature in Chrome and Firefox as described in the following step.
-
In Chrome or Firefox, click the shield icon in the Address bar and agree to load an unsafe script (Chrome) or to disable protection on the page (Firefox). In Firefox, the shield icon is located on the left side of the Address bar.

Safari has no option to disable protection. You must use Chrome or Firefox for previewing.
The correctly formatted page should load automatically. You can start editing theme files in your editor and previewing changes locally in the browser.
Previewing changes
After starting the theme preview mode, you can work on your theme files in your favorite editor. Work iteratively to develop and test your theme. For example, make some changes to your JavaScript, save the changes, then refresh the browser page to test the changes.
To preview changes
- Save the edited file in your editor.
- Refresh the page in the browser.
When you’re done for the day, you can stop preview mode using one of the following methods:
- Switch to your browser and click the “To exit, click here” link at the top of the previewed page.
- Switch to your command-line interface and press Control+C.
-
-
Working on a theme locally
The most powerful theming features in Guide are the abilities to import, export, and work locally with themes. When you’re making major updates to a theme or building your own theme from scratch, these great options enable a streamlined workflow for developers.
You must have Guide Professional or Enterprise to work on a theme locally.
The workflow to build a new theme or update an existing theme locally is:
- Select a starter theme
- Edit your theme locally with your own development tools.
- Import your theme back into Guide.
- Publish your new theme.
Select a starter theme
If you’re interested in building your own custom theme, we recommend starting with copy of our Copenhagen Plus theme to take full advantage of our powerful theming framework. Alternatively, you can start with one of our many custom themes.
Editing your theme locally
Now you’re ready to start working on your local machine, using your own development tools.
To avoid zipping and importing the files into Guide every time you want to preview your changes, you can preview each change locally in a web browser using the Zendesk apps tools (ZAT). The goal of the local preview is to enable theme developers to work with the tools they’re familiar with to build themes quickly and easily.
To set up ZAT theme preview, see Previewing your Help Center theme.
After you start preview mode, you can modify your theme files in your favorite text editor. The local preview has live reload. Changes you make to files will automatically refresh the preview. From here, you can quickly make changes to templates, CSS, JavaScript, and assets.
Additionally, when you have exported a theme to your local machine, it’s a good idea to check it into your favorite version control repository (git, mercurial, SVN, etc.).
Importing your theme
Once you’ve built out the theme locally, compress the theme directory into a ZIP archive and import it into Guide by dragging and dropping the file on the Themes page or by using the import option.
This will import the theme as a new custom theme. You can preview further in Guide, and other users in your organization will also be able to see the theme.
To export your theme, see Importing and exporting your theme.
Publishing your new theme
When you are ready to publish your new theme, just click Publish from the theme menu in the workbench.
Remember, if you are using version control and you’ve made any code modifications to your theme in Guide, export the latest version and check those changes into your repository.